
For our customer Brring we built a sophisticated conferencing server backend and single page web app front end. With everything communicating via REST JSON over HTTP we needed to get a very simple, trouble free deployment up and running as quickly as possible. We looked at AWS, Azure and Digital Ocean which we use on other projects but for this particular task we chose to use Heroku.
Heroku is a cloud platform which offers simple, easy to use deployments of application services written in Ruby, Python, Node.js, PHP, Go, Scala, Java, and Clojure. In addition it offers a range of PaaS (platform as a service) additions including a managed Postgres, Kafka and Redis add-on. We chose to use their hosted Postgres instance - this DBaaS (database as a service) offering allows us to focus on our data queries whilst Heroku take care of database patching, availability and security.
Another other great benefit of the Heroku platform are the numerous 3rd party add-ons available through their Elements marketplace. Here you can find features like Logging, Analytics, Messaging, Email and other datastore services like MariaDB and MongoDB to name a few. With a few clicks these are instantly provisioned and running alongside your application enabling advanced features for your service to be added quickly and simply.
The particular deployment we chose took only a couple of hours to setup and provided resiliency and load balancing for our application.
Application Structure
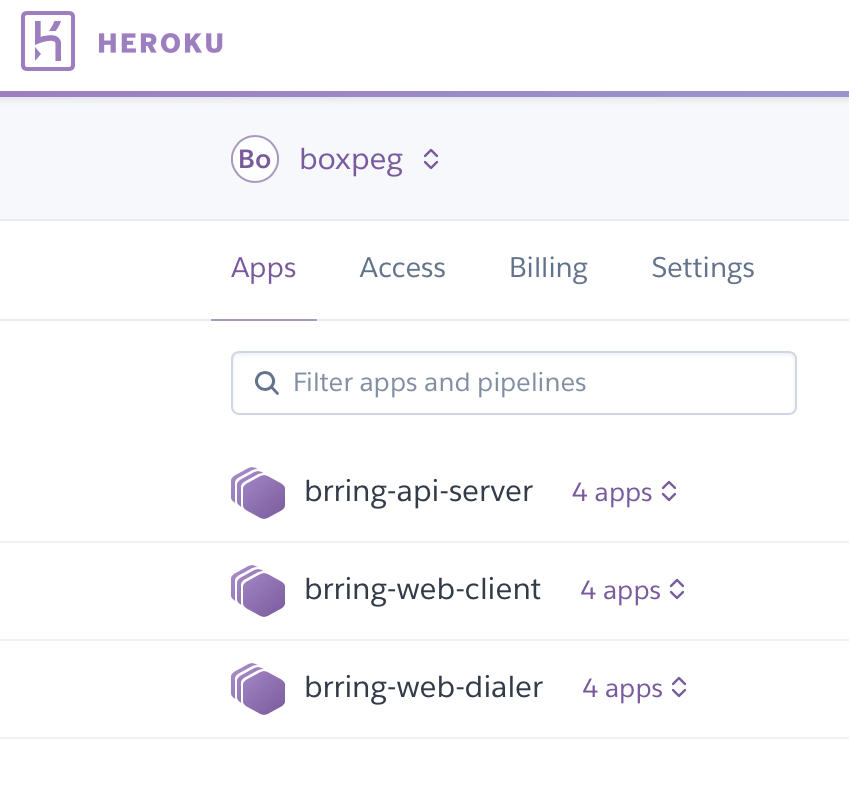
Our application consists of three main services - one API server and two single page web applications which communicate via REST:
- Brring API Server (Spring Boot - Java)
- Brring Web Client (Node.js - TypeScript)
- Brring Live Dialer (Node.js - TypeScript)
Our first step was to size up the container (or in Heroku parlance dyno) that we would need. Java alas can be a little memory hungry requiring us to step up to a pair of Standard-2X dynos.
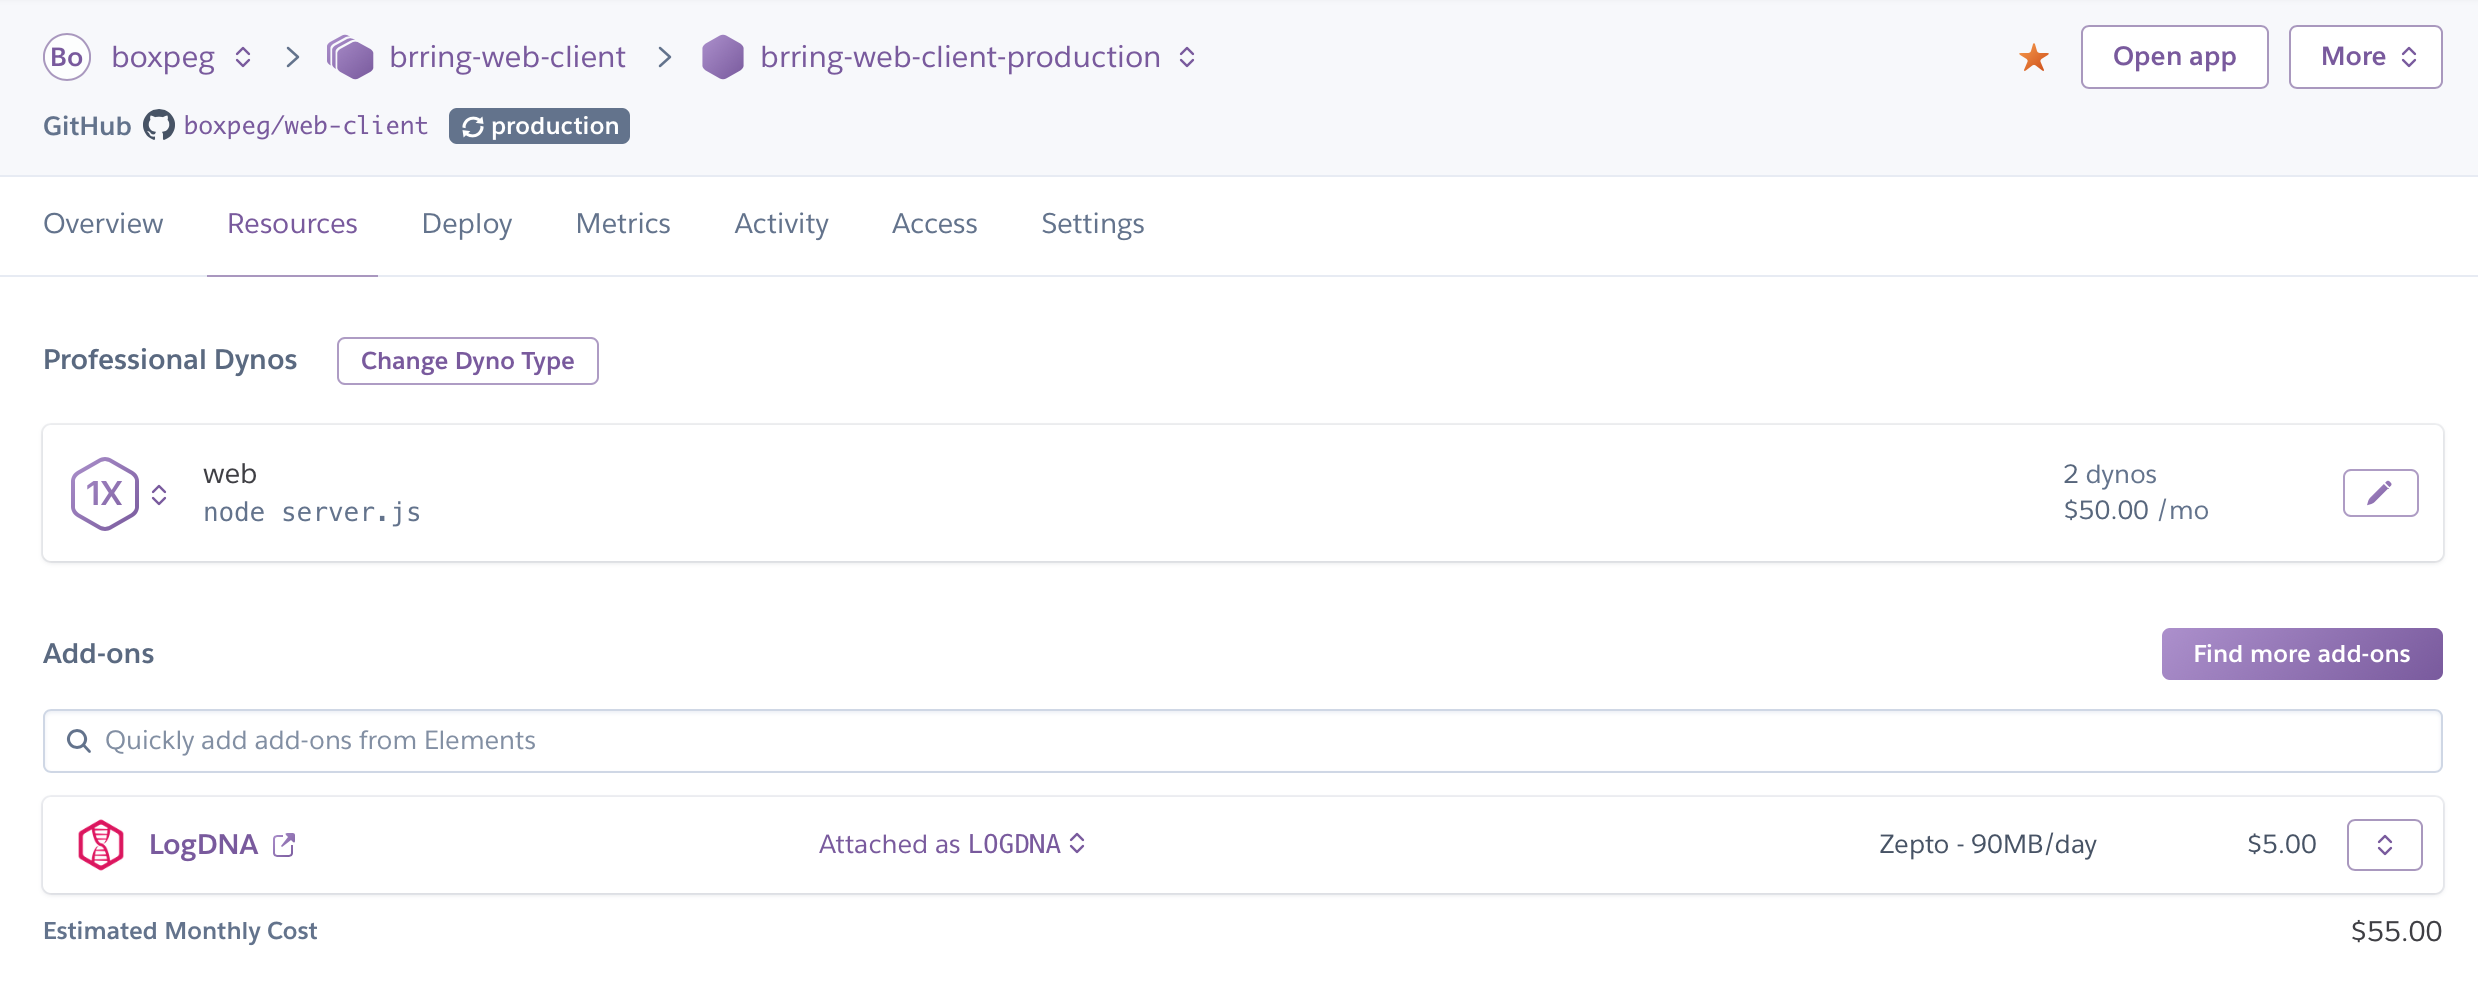
Node.js by contrast has a smaller footprint and to be honest our Node.js client services are very simple merely deploying and serving up static assets. For these the Standard-1X dynos suffice.
We ended up with:
For resiliency and load balancing we deploy a pair of dynos for each service and enabled preboot which changes the standard start/stop behaviour in Heroku. Instead of stopping the existing deployed application before spinning up a new deployment it spins up the new instance, has it ready and receiving traffic before it shuts down the old instance. Since this can result in running two versions of your code side by side you need to consider this feature carefully but it's handy if you want to minimise downtime.
Configuration
Heroku apps require a Procfile which is used to specify the main command required to get your app up and running. In addition you can include an app.json file which allows you to provide some defaults for your app without having to manually specify configuration variables for every deployment.
For our Node.js web services we used:
Procfile
web: node server.js
app.json
{
  "name": "Brring Web Client",
  "description": "Brring Web Client",
  "scripts": {
  },
  "env": {
    "REACT_APP_API_URL": {
      "required": true
    },
    "MY_VARIABLE": {
      "required": true
    }
    ...
  },
  "formation": {
  },
  "addons": [],
  "buildpacks": [
    {
      "url": "https://github.com/siassaj/heroku-buildpack-git-deploy-keys.git#master"
    },
    {
      "url": "https://github.com/mars/create-react-app-buildpack"
    }
  ]
}
For our Spring Boot API server we used:
Procfile
web: java $JAVA_OPTS -Dserver.port=$PORT -Dspring.profiles.active=$SB_PROFILES -Duser.timezone=Etc/UTC -jar api-server/target/*.jar
app.json
{
  "name": "Brring API Server",
  "description": "Brring API Server",
  "website": "https://www.brring.com",
  "repository": "https://github.com/boxpeg/brring",
  "scripts": {
  },
  "env": {
    "SB_PROFILES": "dev,postgres,mongodb,twilio",
    "MY_VARIABLE": {
      "required": true
    }
   ...
  },
  "formation": {
  },
  "addons": [
    "mongolab:sandbox",
    "heroku-postgresql:hobby-dev",
    "logdna:quaco"
  ],
  "buildpacks": [
  ]
}
Additional Services
For our production Spring Boot (Java) API server instances we opted to use Heroku Postgres for relational data and mLab's MongoDB service for NoSQL data. In hindsight we could have used Postgres for both but legacy design decisions meant the need for both databases. The last add-on to be deployed is LogDNA for log capture and analysis.
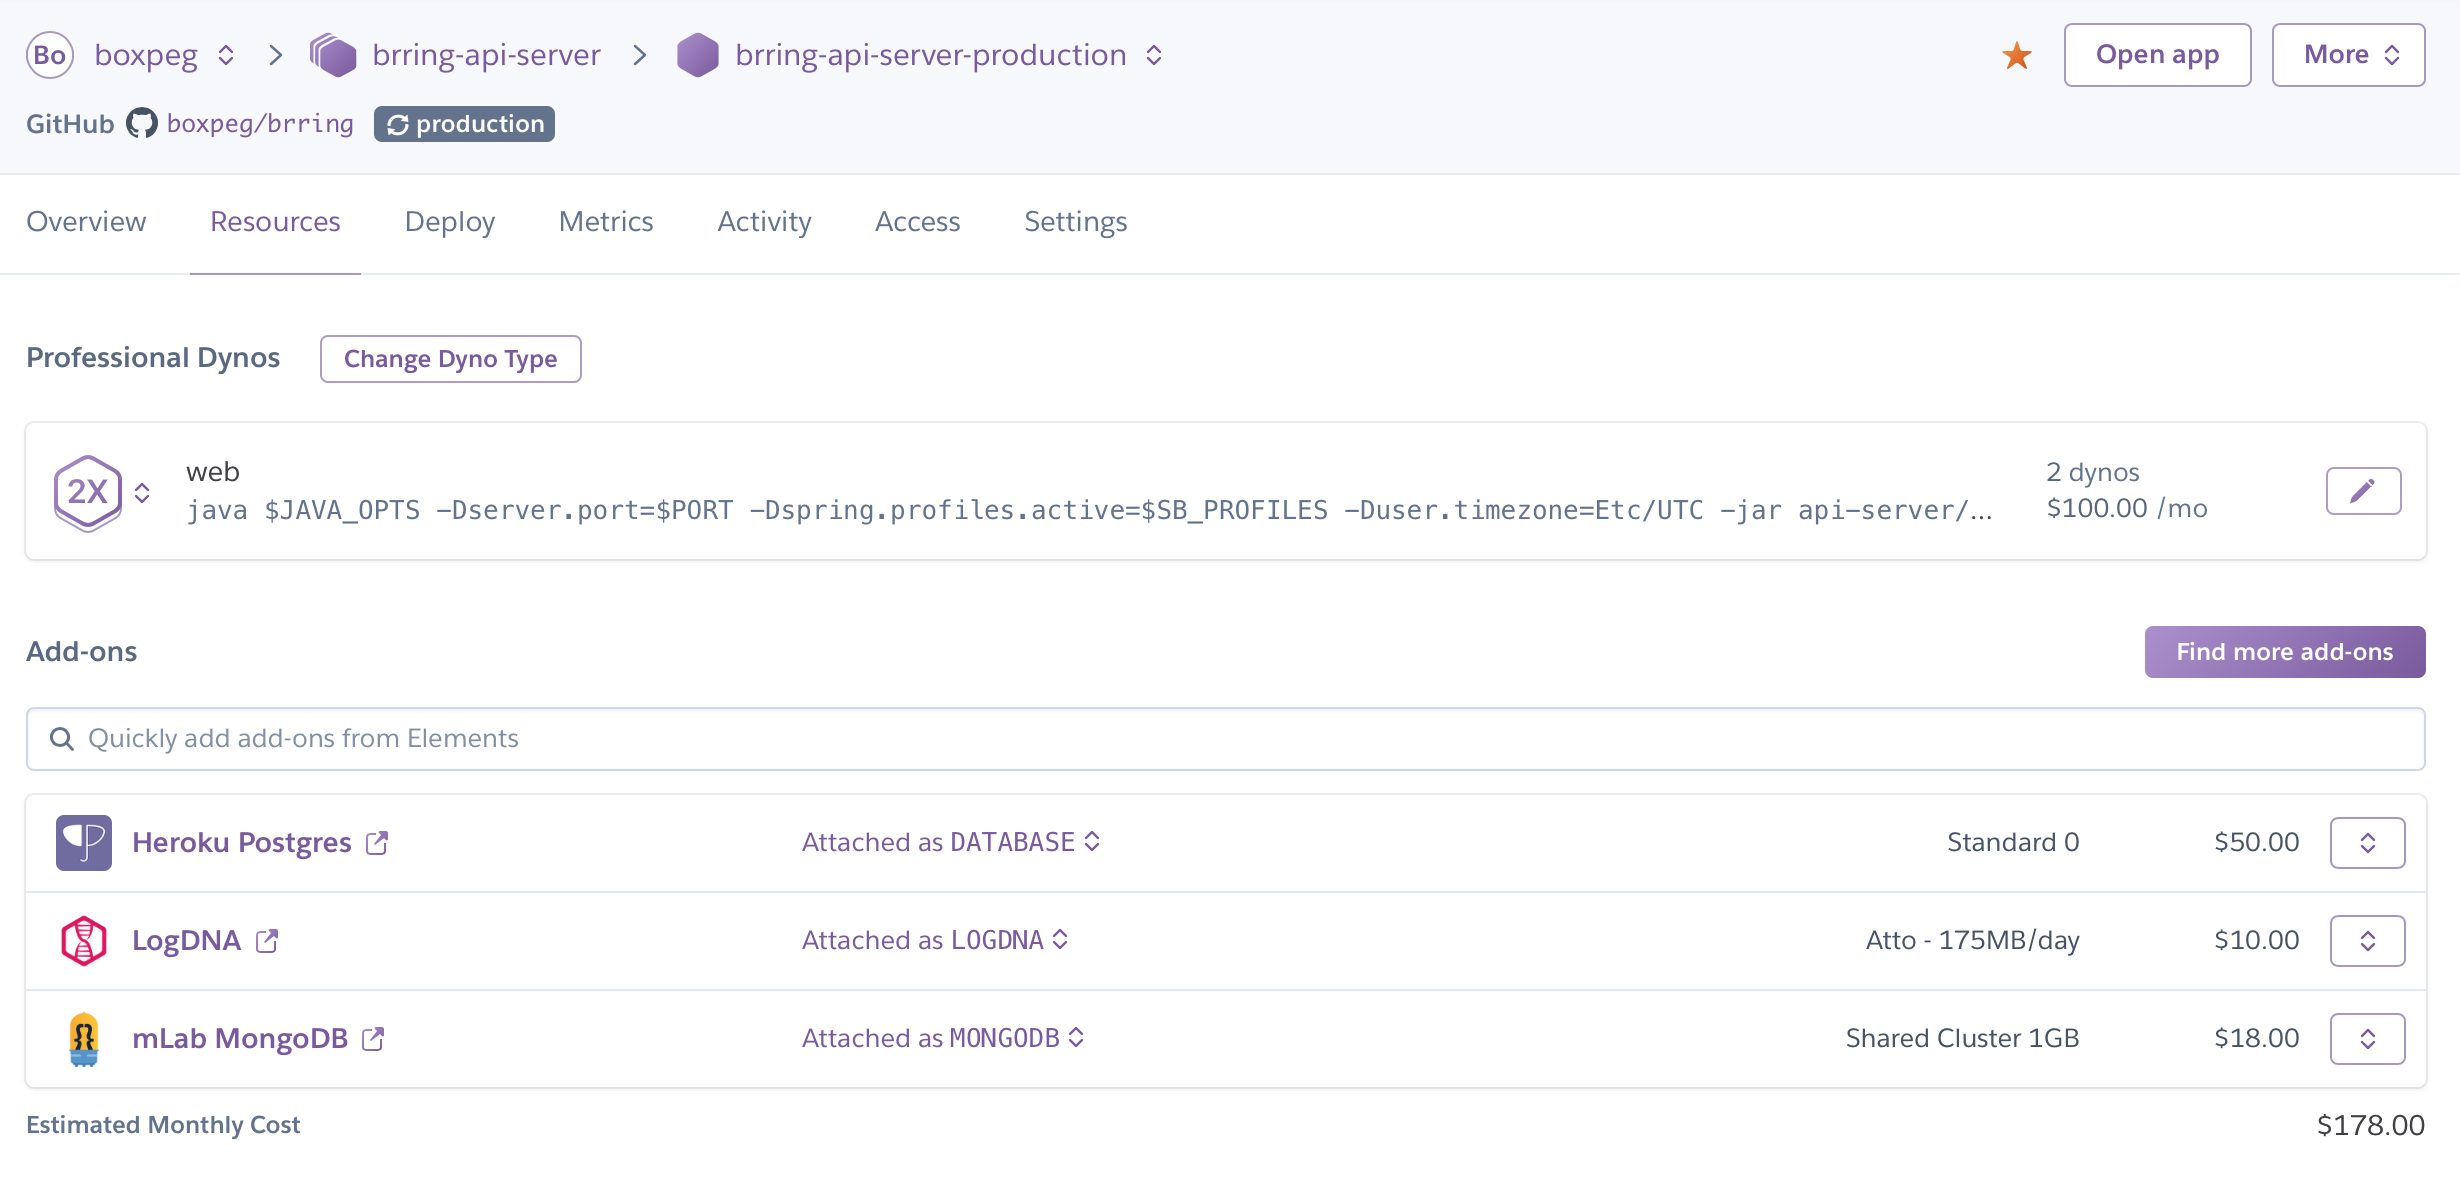
Our Node.js services did not need to persist any data so for them we only needed to enable LogDNA for logging.
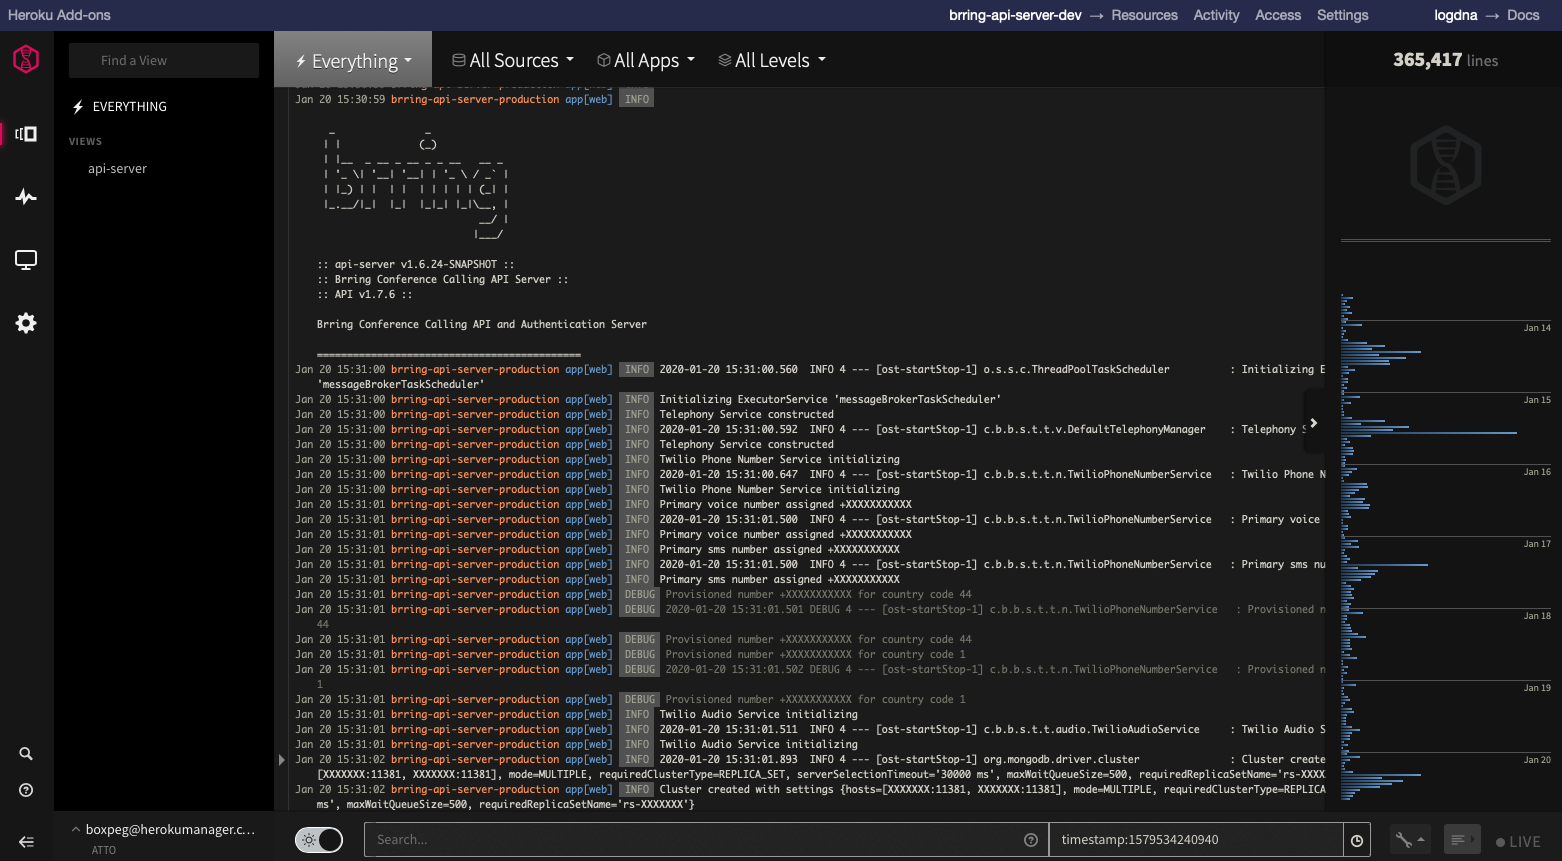
One nice thing about Heroku's marketplace is that it allows for single-sign on to the additional services. If you're logged into Heroku you can access all your Element add-ons from one place. Here's an example of LogDNA's dashboard accessed directly from within Heroku:
Source Tracking & Deployment
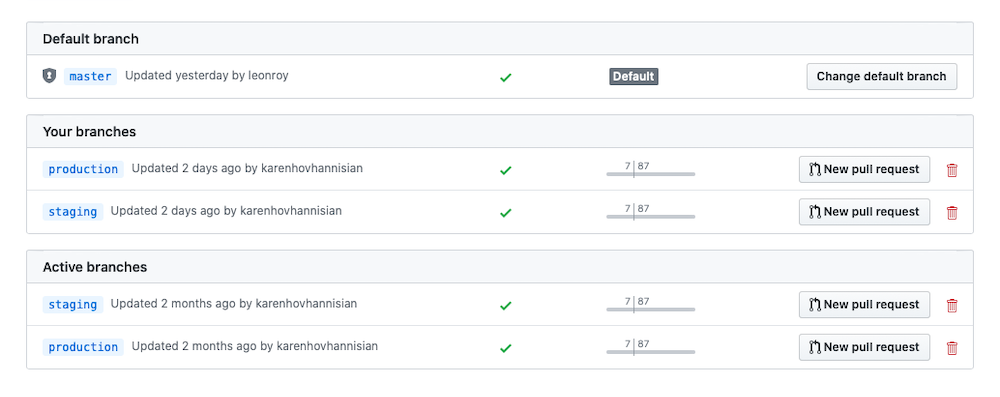
For deployment Heroku offers a convenient multistage pipeline system. This allows us to have continuous integration and deployment of development, staging and production builds. To do this we created equivalent branches in Git - one named production the other named staging. We chose to use master as our development branch with approved pull requests getting merged there. Some teams choose to use master as their production branch instead.
Here's how it looks in GitHub:
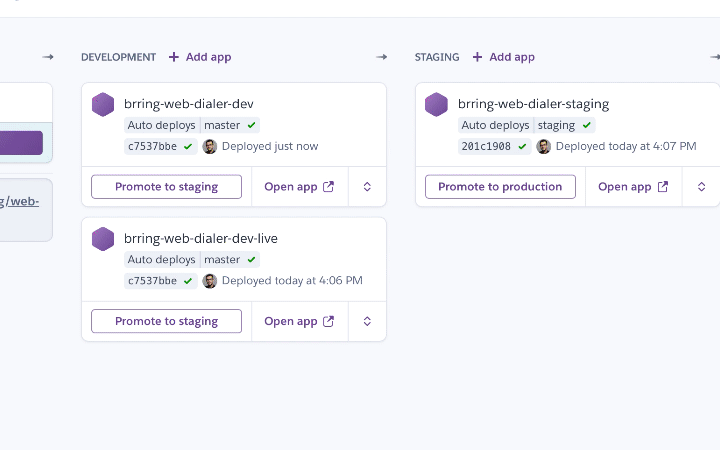
Next we setup our Heroku pipeline with four stages. Review, Development, Staging and Production to track their respective Git branches.
- Review - Deploys from any Git PR (pull request) branches
- Development - Deploys from Git
master - Staging - Deploys from Git
staging - Production - Deploys from Git
production
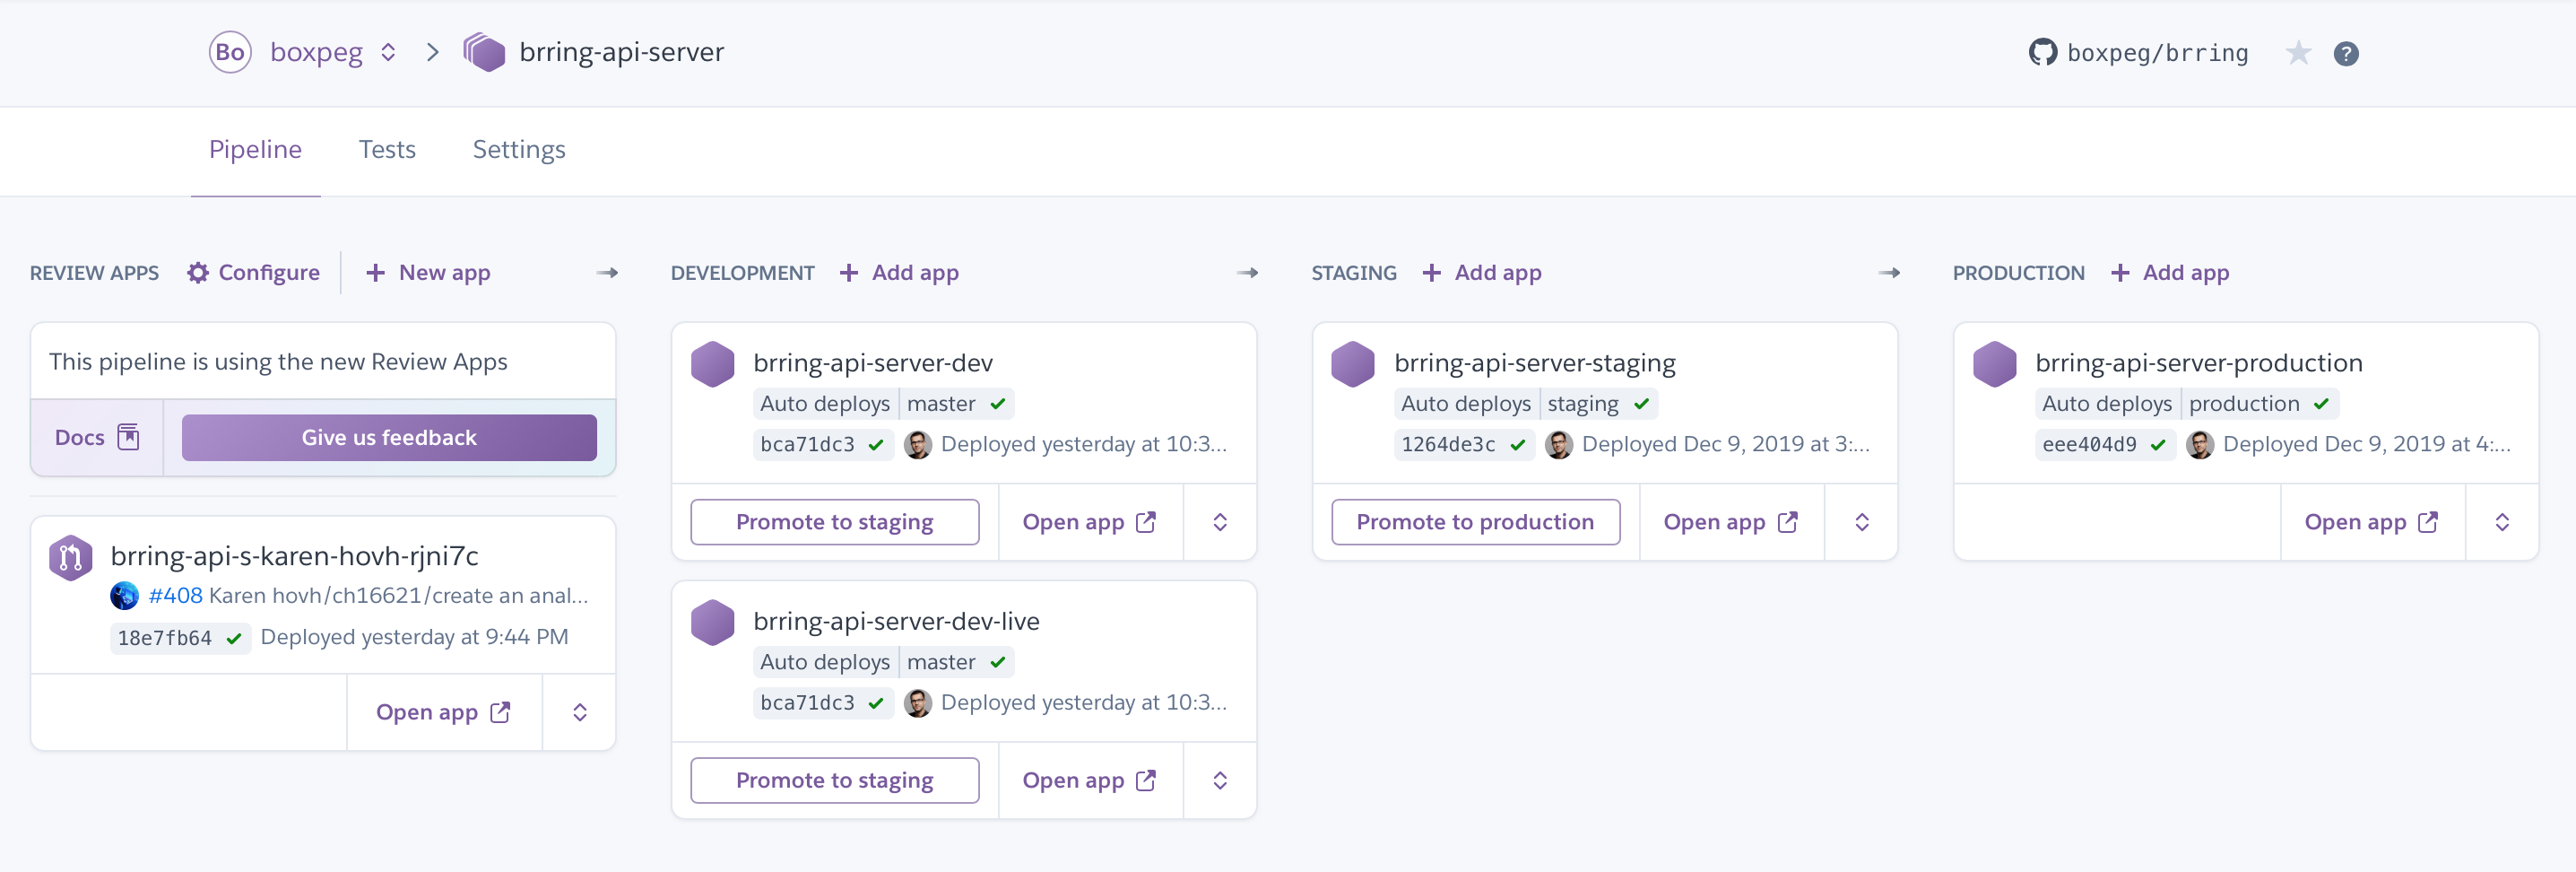
Review apps are interesting - they auto deploy pull requests created by the dev team and allow our stakeholders and testers to quickly evaluate new functionality before it hits the master branch. You get one new review dyno created per PR. If you're generating a lot of PRs and have auto-create enabled here expect to be billed accordingly!
Development is where our new code changes get deployed from the Git master branch. Once all tests have successfully passed and our code has been successfully built it gets automatically deployed by Heroku to the Development dynos here. Simple deployments might have just one development app, more sophisticated setups might have multiple apps deployed here.
Staging mirrors our Production setup as closely as possible - it does not contain any customer data however. The idea is to shake out any environment or setup bugs which we didn't catch in our dev environment. It's also where we test our versioned and tagged release candidates.
Production is of course our public facing production branch which runs the latest fully tested and QA'd version of our app and is used by end customers.
Configuration of auto deployment is straightforward and managed within Heroku:
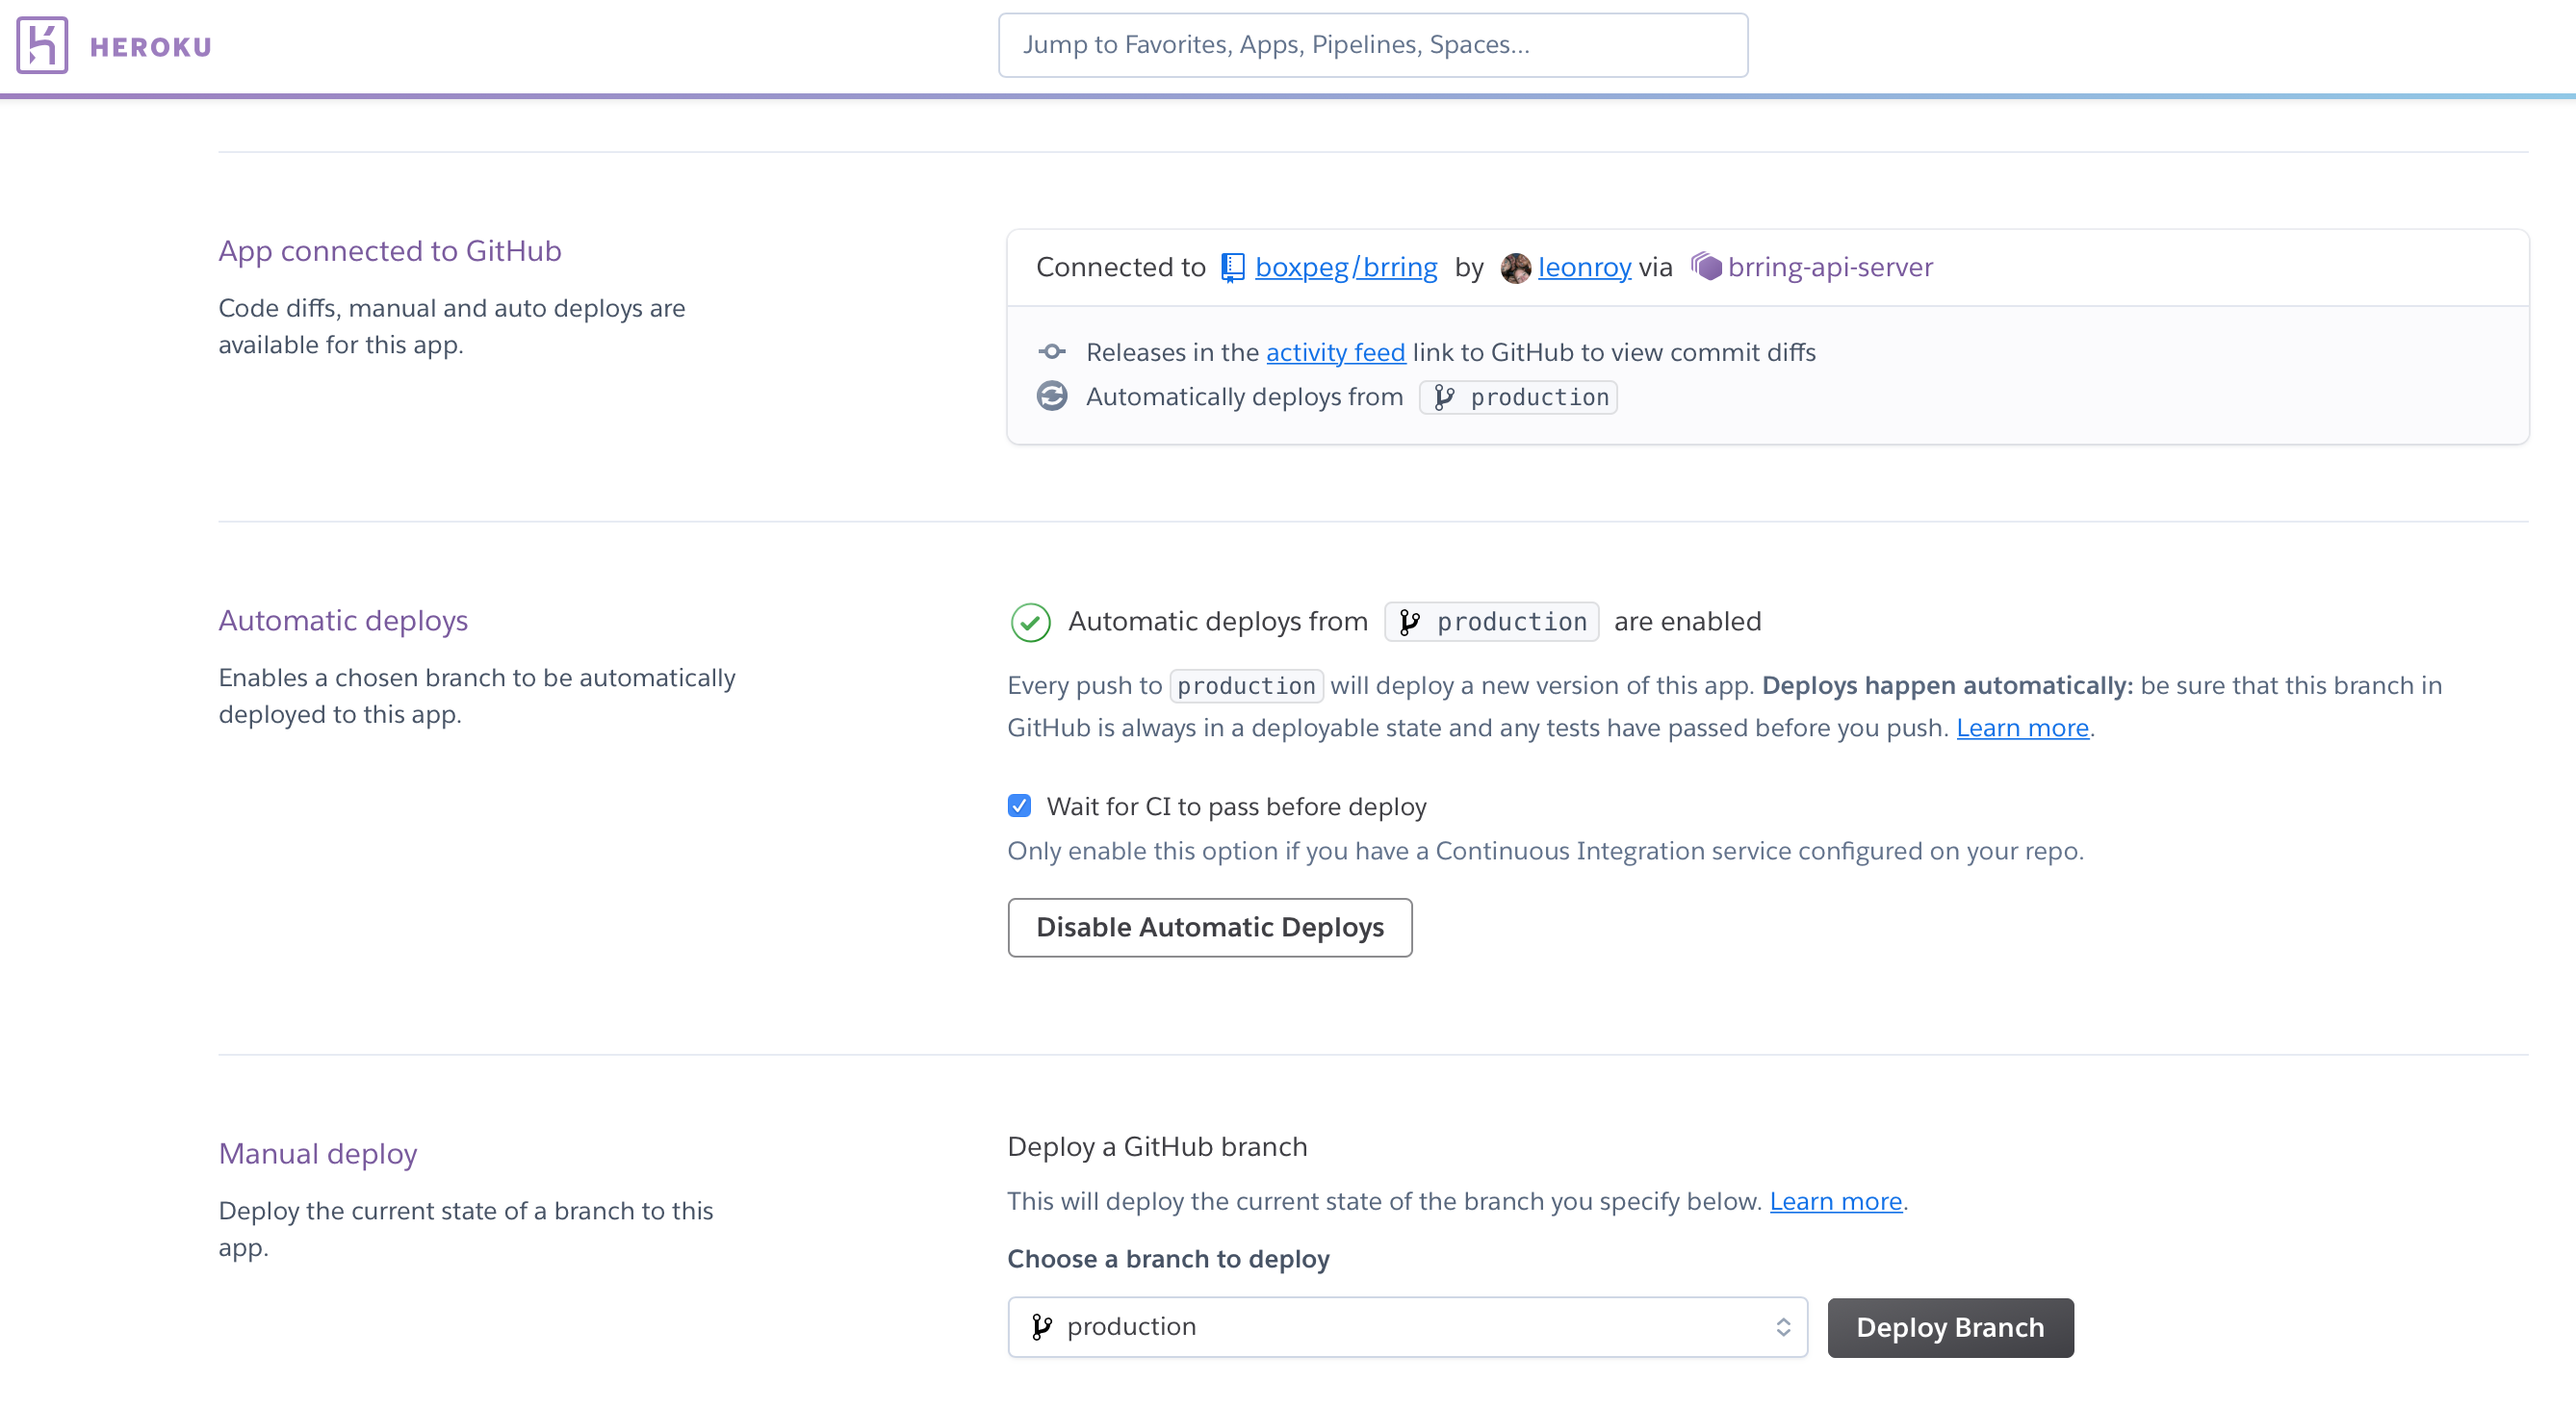
The basic idea is that once code gets pushed to a branch and all tests run successfully our code gets automatically deployed by Heroku to the corresponding stage in the pipeline. Once we have a stable release candidate in master with a good bunch of fixes and features we merge master into staging and version/tag it. Once QA have approved our staging release we then merge our staging build to the production branch whereupon Heroku deploys it and our customers finally get to enjoy all those features and fixes.
With all of this we get continuous integration and continuous deployment - all setup within an afternoon.


